Because the adhesive is so strong, removing the hardwood without the proper tools could cause a tremendous mess or leave your subfloor permanently damaged. So if you want to know how to remove glued hardwood flooring, then you have come to the right place.
In most cases, you can remove glued hardwood flooring from the subfloor by cutting the boards into smaller pieces, which can make them easier to manage.
This can be done with a selection of different tools such as a scraper, chisel or hammer and when you are done you can either re-use the wood or throw it away.
In the following article, we are going to teach you how to remove glued wood flooring without errors, while also outlining the tools and supplies you will need for the job. We have even included some useful tips about how you can make the overall process easier and faster.
What You Will Need
When it comes to hardwood flooring, there is often a chance you will need to remove it to combat age or update the material. And while this process can be challenging, it is even more intense when the wood is glued to subfloor or concrete.
So before we can teach you how to remove the glued hardwood flooring, let’s take a look at the tools you will need to get the job done:
Hammer
Flooring chisel
Long-handled pry bar
Putty knife
Flooring scraper
Circular saw
Reciprocating saw
Protective goggles
Facemask
Work gloves
Knee pads
Closed toed shoes
Oscillating tool
Painter’s tape (optional)
Once you have collected all of the necessary tools, it’s time to start using them to remove the glued hardwood flooring.
Step One: Prepare The Workspace
Before you can start removing the wood flooring, you will need to prepare the workspace.
This can be done by removing any furniture from the room and laying plastic sheeting over the ground to catch the debris. It is also important to cover light fixtures and electrical outlets with painter’s tape to avoid further damage.
During this step, it is advisable to wear protective goggles and work gloves, as well as closed toed shoes to protect your feet from falling objects.
Step Two: Measure The Flooring
To begin removing the wood flooring, you will need to measure the area that you plan to remove.
If you want to remove only a portion of the flooring, then you can mark off the location using painter’s tape and complete the process without causing any damage to the rest of the flooring.
During this process, you can use the painter’s tape to place a line on the joint of the wood flooring. This will allow you to make a boundary around the area you intend to cut, with the tape also helping to protect the edge of the wood flooring that you wish to keep intact.
Step Three: Cut The Flooring
If you have parquet flooring, then you won’t have to cut the hardwood into manageable pieces, as this flooring usually takes the form of small square tiles.
However, if you are dealing with solid hardwood flooring, then you will need to cut the old wood every 2 – 3 inches using your circular saw.
When cutting the wood, the cuts should run perpendicular to the flooring direction and follow the boundary made by the tape.
For the best results, it is recommended that you use a buzzsaw with the same thickness as the flooring, as this will deliver a cleaner cut. You should also avoid cutting into the floor’s tongue, as this could cause lasting damage to the intact hardwood.
Step Four: Remove The Flooring
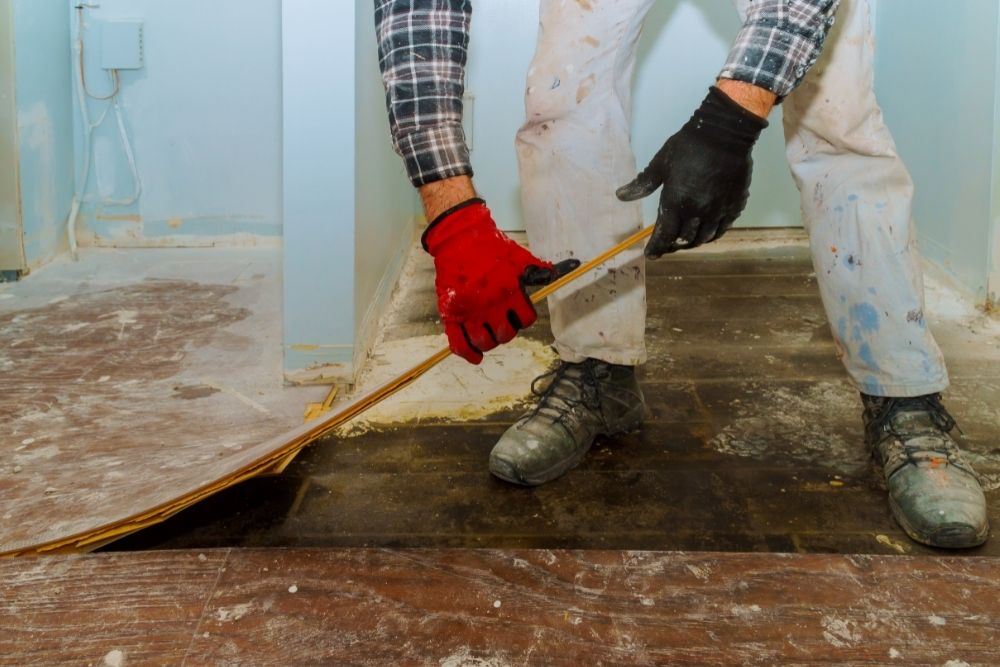
Once the old flooring has been cut into smaller pieces, you can start removing it from the subfloor. If the flooring has been glued down, then this process could prove more challenging, which means you will need to take your time to ensure the best results.
When removing the flooring, you will need to use elbow grease and a selection of different tools, with the most popular options being a chisel or hammer. It is also possible to use a long-handled pry bar, as the tool can help to pry up the wood and protect your back from harm.
To begin removing the flooring, you will need to remove the baseboards first and then use the pry bar to pry around the edge of the board and lift. If you are working with glued hardwood floors, then this could prove difficult and you may need to cut the wood into smaller pieces to remove it quickly.
Step Five: Chisel The Concrete
When the wood flooring has been glued down to the subfloor, it can make the removal process more difficult and time-consuming, as the wood will usually come away in pieces due to the strength of the flooring adhesive.
So to combat this problem, you will need to use your flooring chisel and hammer to scrape away the remaining debris while working towards the nearby boards.
If there is still a large amount of flooring adhesive stuck to your subfloor, then you can use an oscillating tool to remove it, as this will apply enough force to push the scraper under the glue.
Step Six: Remove The Glue
For the final step, you will need to remove any excess glue that remains. This can be accomplished by using a hand scraper with a long handle, although the overall process can be very labour-intensive.
If the glue is not coming off, then you can use an adhesive remover or stripper, which should break down the glue and make it easier to remove. This involves using a putty knife to spread the remover across the flooring adhesive, although you may have to repeat the process in more stubborn areas.
The only downside to using adhesive remover is that it can sink into the subfloor and damage the glue used to hold down your new wood flooring. For this reason, it is advisable to check the warranty on your new floor before committing to this method.
Helpful Tips
Now that you understand how to remove the glued wood flooring, let’s take a look at some helpful tips that can make the process easier and faster:
How Can You Tell Your Floor Is Glued Down?
When buying a new home, you may not always know how the previous owners chose to install their wood flooring, which can make it difficult to determine if the wood floors have been glued down.
Fortunately, you can tell if engineered hardwood flooring has been glued down by inspecting the thresholds and transitions.
However, if your home has concrete floors, then it is possible that the wood flooring has been glued down. If you notice nails around the perimeter of your wood floors, then this means it has been nailed to the subfloor and will be easier to remove or replace.
How Can You Remove Glue From The Subfloor?
When you need to remove flooring adhesive from your concrete floors, there are countless methods that can be used. For example, you can soak the subfloor using a damp cloth and warm soapy water, which can make it easier to remove adhesive.
Alternatively, you can also hire a heat gun that can be used to soften the residual glue. For this method, you will need to hold the heat gun carefully while hovering it over the exposed adhesive. Once the glue has melted you can remove it using a scraper attachment.
How Can You Dispose Of Old Wood Flooring?
While removing old flooring can be a complicated task, it can be even hard to dispose of the material once it has been pried away from the subfloor.
Unfortunately, many trash removal companies do not handle construction material, which means you will need to dispose of your glued down wood flooring by taking it to your local dump.
In some cases, certain garbage companies will also accept construction materials one day a month, as long as the wood has been properly bagged in heavy-duty plastic. To see what options are open to you, we recommend contacting some national and local companies for help.
If you are still having trouble getting rid of your glued down wood flooring, then you could also contact a local floor company for advice.
However, you should never attempt to dump the material or burn it, as glued down wood flooring contains a variety of different chemicals that could become toxic when burned.
Final Thoughts
And there we have it, that is how you remove glued wood floors. We hope that you found this article informative and that you will use it the next time you need to replace your floor due to age or damage.