The exceptionally long battery life of a Ring Doorbell is one of the most convenient aspects of the product. The battery can go months without needing to be charged – just enough time for you to forget how to take out the battery!
This quick guide will take you through removing the battery for your Ring Doorbell 3, as well as some common questions and troubleshooting for the most common problems.
How To Remove The Battery
The following directions will work for Ring Doorbells 3, 3 Plus, and 4.
First, you need to remove the security screw in the middle of the underside of your doorbell. To do this, use the star end of the screwdriver included in the Ring Doorbell box.
Once the security screw is out you can remove the faceplate. This is done by pulling the bottom edge of the faceplate away from the wall and up to an angle of around 45°, before pulling away. If you are having trouble, try placing your fingers at the top of the faceplate with your thumb at the bottom and focus on pulling the bottom up towards your face.
Now the faceplate is off you can take out the battery. This is done by pressing the tab in the middle of the bottom of the battery and sliding the battery down.
Now the battery is out, you can take it inside to charge. You also have the option of getting a second battery to put in immediately to avoid any downtime on your Ring Doorbell.
How To Charge A Ring Doorbell 3 Battery
Now you have successfully removed the battery of your Ring Doorbell 3 you can charge it.
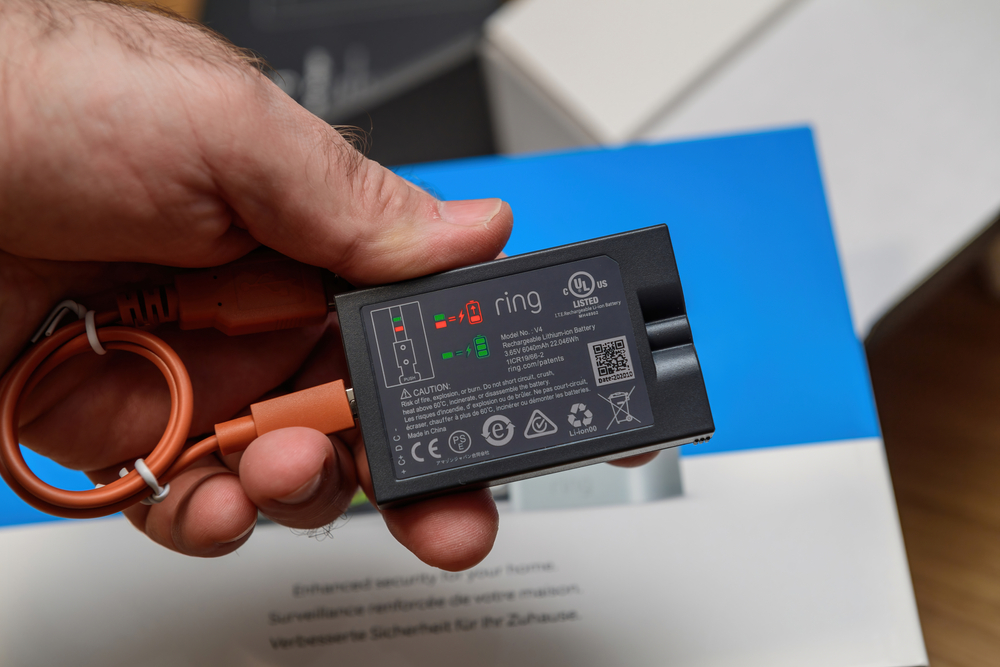
To do this, plug the battery into any USB power source using the orange micro-USB cable included in your Ring box. If you cannot find this cable, the battery is compatible with any micro-USB cable.
When charging, an orange light and a green light will both be lit. When your battery has finished charging the orange light will go out and just the green light will be lit. It is best to fully charge your battery before using it again to prolong its life.
Please be aware that Ring uses software to maximize battery life. If your Ring Doorbell 3 is connected to a solar recharging or internal wiring, you will not see increases in battery percentage at all times. Any automated recharging will not begin until the batter reaches below 90%.
How To Replace A Ring Doorbell 3 Battery
Once the battery is fully charged, it can be put back into the doorbell.
To do this, slide the battery up back into its slot. When this has been done successfully you will hear a click. This means the battery is secure.
The faceplate now needs to be replaced. This is done by slotting the top into place, then pressing on the bottom. When done properly, you should hear a click as the bottom clicks into its proper position.
Lastly, finish off by replacing the security screw. Use the same screw and screwdriver as before and tighten the screw to secure the whole doorbell.
Frequently Asked Questions
How Do I Know When To Remove My Ring Doorbell 3’s Battery For Charging?
You will receive a notification, either on the Ring App or by email, that your Ring Doorbell’s battery needs to be charged. It is best to do this as soon as possible after you receive the notification as a dead battery may mean you need to go through the lengthy set-up process again.
How Long Will My Battery Take To Recharge?
The time for recharging depends on the type of power source the battery is plugged into.
If plugged directly into the wall, the battery will take around five hours to fully charge. If plugged into a different USB power source, such as a computer, the batter will take closer to ten hours.
How Many Batteries Do I Need?
You only need one battery for the Ring Doorbell 3, but having a second is recommended if you do not want to experience hours of downtime on your device while the battery charges. If you do opt for the second battery, remember to charge the dead one before putting it away!
Troubleshooting
A Ring Doorbell is certainly an excellent piece of tech to have outside your house, adding security and reassurance that you can see everyone who comes to your front door. There is nothing worse than when this goes wrong so below are some common problems and how to fix them.
The most common problem is that the battery does not charge when plugged into a power source. This is usually due to Ring’s software protecting the battery. A battery that is too cold loses its effectiveness and cannot hold power.
Similarly, a battery that is too hot may not work and has the potential to become a hazard. To combat this, Ring’s software does not allow a battery to charge so bring the battery to room temperature before trying to charge again.
Another frequently reported problem by Ring customers is that their battery needs to be charged much sooner than last time. While this may be the battery reducing its ability to hold onto charge over time, it is far more likely that external factors are affecting it.
If your door has seen more activity recently or the temperature has dipped below 30°F (0°C), this is likely the cause of power consumption so just remove the battery and charge it.
For frequent activity detection, you can reduce the sensitivity of the motion sensors so fewer things are detected and your battery should last longer.
Quick Tips
Removing the battery of your Ring Doorbell 3 is easy. Simply remove the security screw, pull the faceplate off at an angle, press the tab to release the battery, and slide it out.
Keep in mind that the battery only really needs to be removed for charging or for replacement, and purchasing a second battery for zero downtime may be an option for you.
Lots of factors affect the duration of battery life so if you feel it needs recharging more do not panic! Just check the weather, warm the battery back up to room temperature if needed, and lower the sensitivity of the motion sensors to prolong life as much as possible.