Keeping the home secure is a major priority for all of us, and technological advances have certainly made distance monitoring easier. Smart devices and home automation have made taking security into our own hands simple – but they come with a downside.
Many home security systems either require a great deal of technical know how, or the help of an engineer to set up. With SimpliSafe, however, things are different. Their security is designed for rental or apartment properties, and the ease of installation makes them the first choice for many.
If you’ve purchased the SimpliSafe video doorbell, then you’re probably looking forward to seeing what it can do. With this guide, you can have your doorbell up and running in no time, ready to keep you safe.
How To Install A SimpliSafe Doorbell
Installing a SimpliSafe doorbell can be done in just a few quick steps:
Turn off the power to your existing doorbell at the circuit breaker. If you aren’t sure which switch is correct, try turning them off individually and testing the doorbell. It shouldn’t take long to find the right one.
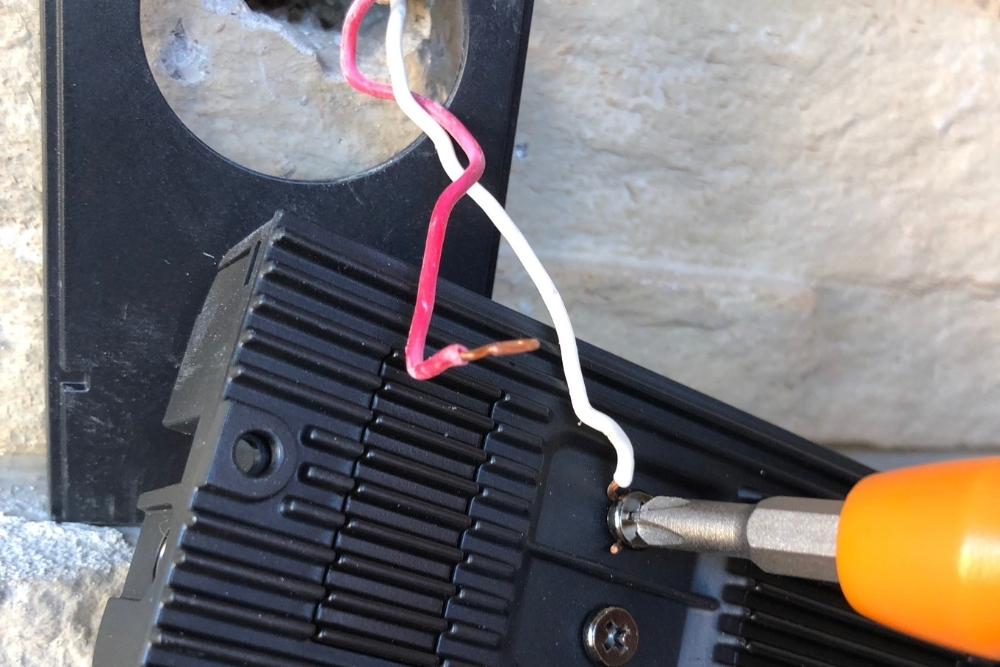
Loosen the screws to remove the existing doorbell from the wall. Then, loosen the screws that hold the wires. Take hold of the wires, and finish unhooking the doorbell. Try taping the wires down, to prevent them from falling back into the wall.
If installing onto a stone or brick wall, use the mounting bracket template to mark the location of the mounting bracket hole. Drill the hole into the wall using a masonry bit. Insert wall anchors, and push into place gently using a hammer.
Thread the wires through the SimpliSafe doorbell mounting bracket.
Attach the mounting bracket to the wall. Begin by marking the location of the holes, and remove the cardboard marker from the bracket. Use the 1” screws provided to fix the bracket in place.
To connect the wires, loosen the terminal screws. Push each exposed wire behind a square washer, and slide around the screw. The wires can connect to either terminal.
When the wires are fixed, tighten the terminal screws.
Push the front of the doorbell onto the mounting bracket, and slide down until it clicks into place. Use a mini screwdriver to fix the screws at the bottom of the doorbell.
Turn the power back on, and press the doorbell. If the doorbell chimes, it’s been installed correctly.
With the doorbell in place, it’s time to set up the Wi-Fi. The camera may take a couple of minutes to charge, so wait a few moments before beginning this step. When the LED ring blinks white, the camera is charged.
Download and launch the SimpliSafe app.
Select the “Menu” button, tap on “Cameras”, and then “Add Cameras”. Click on “Video Doorbell Pro”.
Name your doorbell, and select your home Wi-Fi network. You’ll need your Wi-Fi password to connect.
Select “Get Your Code”.
When the QR or barcode appears, hold the screen about 12 inches away from the doorbell, with the image facing the doorbell camera. Hold the phone as still as possible. It should only take a few moments to scan. If the image doesn’t scan, try adjusting the brightness, or moving the phone closer or further away.
When the code is scanned, a message will appear confirming the doorbell is connected. Your SimpliSafe doorbell is ready to go!
Is It Hard To Install A SimpliSafe Doorbell?
No, the SimpliSafe doorbell is easy to install if you have an existing doorbell. The SimpliSafe system is designed for a DIY installation, much like the rest of the SimpliSafe home security system.
To install the SimpliSafe security system, all you need is an existing doorbell set-up, and Wi-Fi. Minimal tools are required, meaning even a DIY novice can quickly get the doorbell installed.
The SimpliSafe doorbell is small, which allows it to be installed almost anywhere. At less than 5 inches long, it can fit onto corners and shingles, with support wedges included for a smooth set up.
Can You Install A SimpliSafe Doorbell Without An Existing Doorbell?
It is possible to install a SimpliSafe doorbell with an existing doorbell, but it’s much more difficult. To do so, you would need to use an indoor power outlet, a power adaptor, and an extension lead.
If you had an outdoor socket, the doorbell could be powered this way. However, this would make the system much more vulnerable. Anyone hanging around your porch could snip the wire – or just unplug it.
If you don’t want to use an indoor socket, wiring would need to be installed. In this case, the help of a qualified electrician would be necessary.
If you don’t already have a doorbell installed, then the SimpliSafe system becomes much more complicated.
Can You Use The SimpliSafe Doorbell Alone?
SimpliSafe have created a range of home security equipment designed to keep your house safe via 24/7 monitoring. The doorbell can be used as part of this system, but it can also be used alone.
As a standalone video doorbell, the SimpliSafe allows you to view and record anyone who disturbs the motion sensor via the connected app, as well as communicate using two-way audio.
To get the most out of your doorbell, it’s worth subscribing to the SimpliSafe storage plan. This grants you access to saved recordings.
Summary
Installing a SimpliSafe doorbell camera in place of an existing doorbell is a quick way to instantly upgrade your home security. With the SimpliSafe doorbell, you can easily monitor the comings and goings of visitors, both wanted and unwanted.
With two-way audio, motion alerts, and night vision, the SimpliSafe door camera is a fuss free option for quality home security. It also links with other SimpliSafe security devices, giving you total home security.
With an existing doorbell in place, installing the SimpliSafe system will take only minutes. Simply disconnect the power, unscrew the old doorbell, and attach the SimpliSafe device. Finish set-up with the SimpliSafe app, and your camera is ready to go in under an hour.